Rendering complex facade, r(t)pict artifacts

I’ve been learning radiance for a few months now, and I’ve gone through most of the tutorials and documentation.
I’ve been trying to simulate lighting through facade with different shading solutions, and I’ve been getting some artefacts, and would be thankful if you could take a quick look at my settings

model:
the model consists of geometry and gendaylit sky def.

I’ve tried rendering it the rpict way, as simple as it gets

  1. oconv material geometry skydef skygeometry > ocGeo.oco
  2. rpict -vf view1.vf ocGeo.oco > hdri

but no matter what ambient parameters I’ve used, I’ve been getting blotches in renderings.
I’m not sure if the shades are to complex for raytracing to reach the sky.

here’s a quick sample:


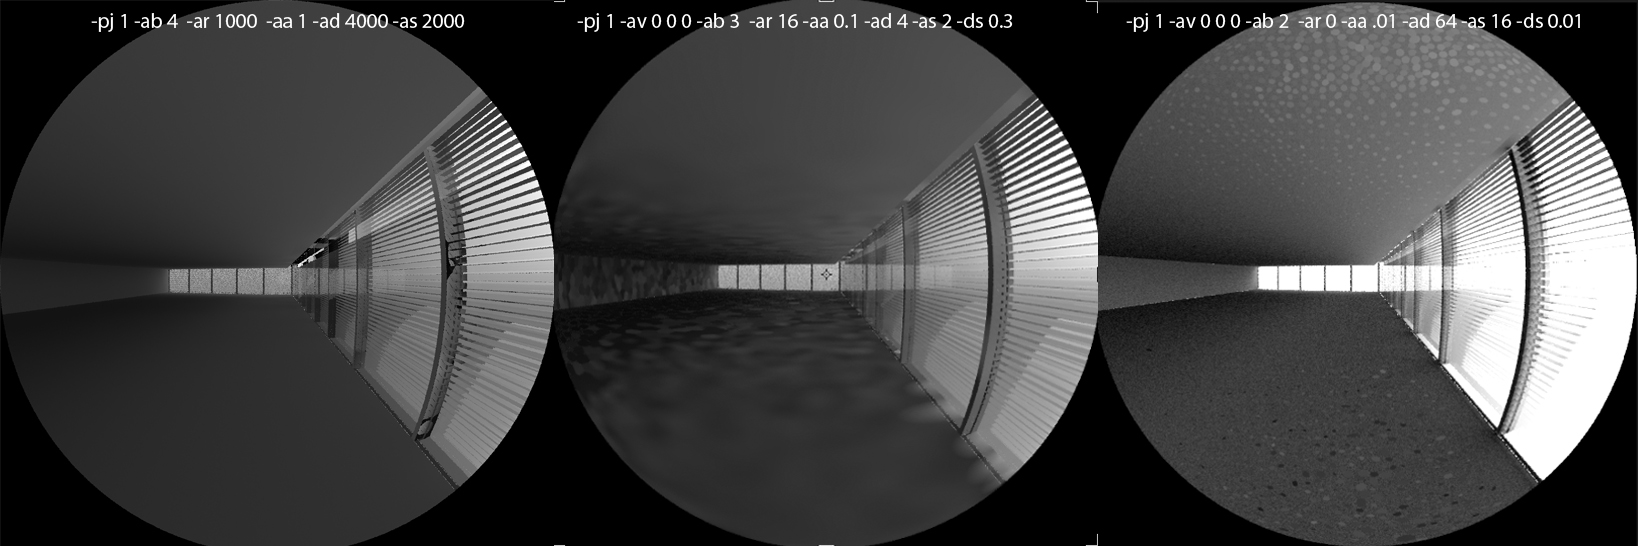
1st pic looks smooth thanks to the high -aa of 1; but it creates less accuracy, and few black splotches

2nd pic shows how the image behaves on all low settings with -aa 0.1. This looks promessing, but as soon as I start raising the -ar, ad, as, black splotches appear throught th image, (Ive rendered the image below using accelerad, since rpict would take a while, but the problems are similar)

3rd pic looks promessing, even pilar shadows are rendered correctly , but I dont realise why the white splotches appear in this case…(not specular)

I’ve tried increasing the oconv resolution, but didnt help.

I’m not sure how to proceed, and if I should keep pushing the vlaues, or take a different approach (Which I did with mkillum - read bellow)

mkillum:
I’ve created a “plane” on the outside of the grills, and used it as mkillum object.
However the renderign times are still high,

I’ve tried rendering with rtpict, but it gives me some artifacts, which I hope someone could help me with

1st) I’ve tried using rtpict for its -n X function, and I’ve been getting blocky patches in my renderings. I’ve seen a post with similar problem, but I didnt found a fix for it. Idid notice that the blockyness is related to
-aa factor

sample:

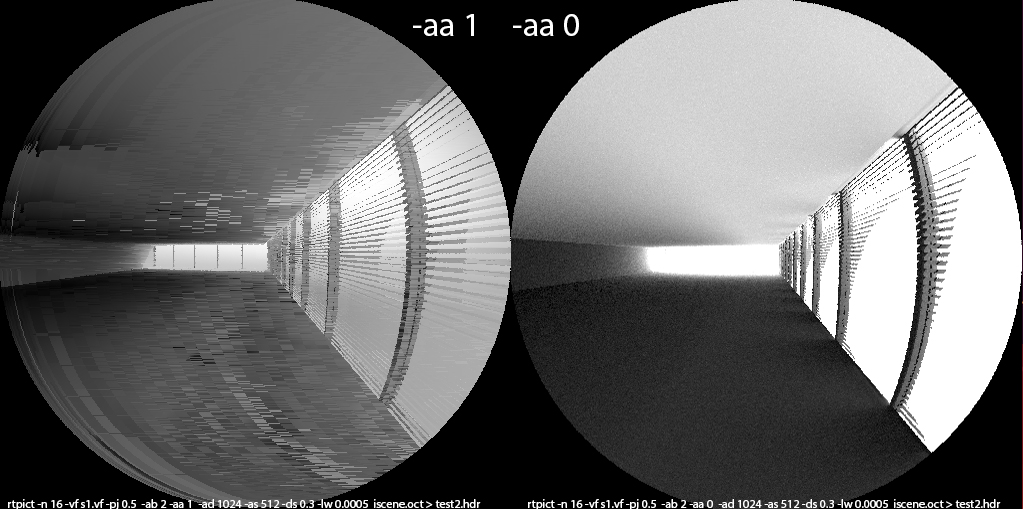
*at left picture I exagerated -aa 1 just so the effect would be more obvious. It happens even at 0.1
I’m relatively happy with how the -aa 0.0 pictures turn out, but the problem is that there’s still some noise, and even with high -ad and -as values it remains. Is there any way of smooting out the remaining noise in the image?

also, the -aa 0.01 value gives render times far greater than 0.00

test files:

https://wetransfer.com/downloads/d359f694b96f52e4190d57b8a598be0c20190203140532/0d3624

sumary:

  1. does light passing through “Trans” material count as a “-ab” instance or not?
  2. is 2 or 4 ambient bounce value enough, or should I up it to 8 (tried it already, but didnt work)
  3. how to minimize the splotches with rtpict, or how to smooth out the result on right pic?
  4. does increasing oconv resolution from 16k help in this matter at all
  5. is mkillum a better approach to this or is oconv/rtrace workflow enough

Why don’t you use the rad program to set rendering parameters for you? You seem to be exploring parameter values that are not even in the right range for this scene. In particular, the -ad parameter should be much higher when -aa is greater than zero. I recommend something in the -ad 1024 to 4096 range for this scene. A -aa setting of 0.1 should be good enough and the -ar setting depends on your overall scene size relative to the interior dimensions. This is why using rad is a good starting point.

thank you for your reply.

I was using this “rule of thumb” http://radsite.lbl.gov/radiance/refer/Notes/rpict_options.html
and the r= maxSize × aa/ar
In my case I was trying 50m*0,1/500=1cm … but didnt do much.

I was hoping I’d get at least a rough preview of the image, and that I’d be able to tweak things from there. But my results did not go that way.

I underestimated value of rad, thought the manual way rvu+rpict is a way to g since most tutorials and comments take that route.

I did try higher -ad parameters, but I also get different problems with it as well. 4 example with rpict, even if I put it up to 1024 it still is relatively noisy. and dont know how to reduce it.

I agree with Greg that it’s best to start from the rad program. Once you’ve identified parameters that work well, then you can tweak them to make the render faster, but you need to know the appropriate range first. Also, 1 cm seems very small for your radius.

It looks like some of your images were made with Accelerad and others were not. It will be helpful if you learn to use classic Radiance first, because Accelerad has additional settings that you will need to think about. Use the Accelerad group to ask about that tool.

If you have specular venetian blinds, which is what they look like from your image, then you may need to use mkillum to reduce the noise due to random specular reflections. (I wasn’t able to download your test files because my unpacker says the archive is damaged. It may just be a newer version of the format – I don’t know.)

here’s a zip file (I’ve added a cam file, and doublel glazing that I used in non mkillum version)

https://wetransfer.com/downloads/e3a8a584b2d637a5c4ed598c5ae6bc5320190203183303/99d0a52153b5a3d1b426c6b2cc1dc38520190203183303/3a4582

I’m going through rad now. I was using mkillum in the 2nd set of images. I believe I did a correct workflow with it.

  1. Created oct with room and sky (but not shades, and no window plane)
  2. ran mkillum with the window plane
  3. added iwindow and shades to scene.oct
  4. r(t)pict

p.s. wetransfer has some adds/trackers so, adb+ might be blocking it.

To get a clean rendering, you need to place a virtual surface inside of the venetian blinds, which I see from your materials file are over 50% mirror-reflective. Use this instead of the window for mkillum. (The surface can use a trans modifier with arguments “1 1 1 0 0 1 1” if you like.) You should also add some non-zero roughness so this doesn’t pose such a problem with solar reflections, which I assume is the cause of most of your artifacts. A value of 0.02 should be enough. This will reduce or eliminate most of the artifacts. I recommend using the following options for running mkillum:

-ab 4 -aa 0 -ad 128 -as 0 -lw .001

thank you. I’ll give it a try as soon as my RAD calculation ends, I’ve given it a try. Thank you for recommending it.

Hi Lucano,

using mkillum was a good idea, however, you need the surface on the inside of the fenestration. Radiance will then precompute the incident radiance on that plane as an average. The resulting illum will become an extended ‘light source’ for the indirect-diffuse calculation. This means that you need refined ambient settings with mkillum, but can relax then in the following rpict/rtrace steps.

If the blinds are highly reflective, you may instead consider the photon map. Here, the additional surface (photon port) needs to be on the outside of the fenestration.

Finally, you can use genBSDF and pkgBSDF to generate a combination of geometric model and BSDF. This would also work in annual simulations. If your facade comprises identical modules (equal width), you could generate the BSDF/geometry module for one module and instantiate that.

Cheers, Lars.

thank you for the detailed elaboration.
You’ve given me a lot to ponder about, and will gladly try all the options.