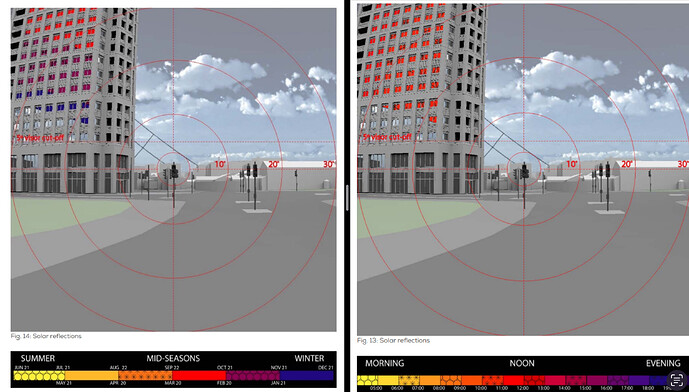
I want to create two custom skys to take two images to assess where and when solar glare occurs in reflective glazing. One sky would have 6 long stripes from east to west representing the months of sunlight and the second showing short north to south stripes showing the times of the day. I have setup the rest of the script in grasshopper, I just need to know how to create the two custom skys with honeybee radiance.
Please help!
Hi @HannahAK,
Welcome to the Radiance discourse. For questions about Honeybee, you should try the Ladybug discourse forum.
In terms what you can do in Radiance, you can of course create custom skies using .cal file scripting, if all you want to do is color parts of the sky. Alternatively, you could take a look at the 5-phase method to understand how it places individual suns in the sky to produce exact shadows. This wouldn’t involve any custom scripting.
However, I have a feeling that all of this is more work than you need to do. You have already produced images that show the times when the sun’s reflection is in the windows. Any time the sun’s reflection is present at the view point, you can assume there is glare. Further simulation isn’t really necessary.
Hi Nathaniel,
I did try the Ladybug forum first and was told this would be a better place for this question. The image I posted is the outcome I want to get. Just struggling to produce the skys to be reflected in the glazing.
I would rather colour the sky to show when there would be potential for glare.
Hi Hannah,
I don’t know how to do this off the top of my head, but it seems like you want a sky function that tells you the season for each potential solar position. So, for a given latitude, you want to work backwards from a sky position to the corresponding time of year when the sun crosses that point.
The formulas for going the other way, for time and date to solar angle, are captured in the “sun.cal” file distributed with Radiance in the ray/src/cal/cal/ directory. Unfortunately, there are a lot of sines and cosines, so inverting these formulae is difficult (or may be impossible to do exactly).
Someone out there must have worked this out, because there are plenty of solar trajectory drawings on the web, just not any falsecolor ones I could find.
Has anyone else played around with this?
-Greg
Hi @Greg_Ward
yes just wanting to show where and when solar glare could occur. I just need to create a custom sky dome with the two sets of sun paths mapped onto it so when the glazing is mirrored it will show where the glare could happen.
thanks,
Hannah
Hi Hannah,
If you only want a small sampling of solar positions, you can just render N times of the year, yielding N sun-only images, which you can combine into a single visualization if that is your goal. If this direct approach is taking too long, you can use rfluxmtx, instead:
Call rfluxmtx to create a vector of images with a well-divided Reinhart sky, combining with gendaymtx -d output for all the solar positions that interest you. (Alternatively, you can do many runs of genskyvec.) This will quickly give you as many solar-direct renderings as you like, but you’ll need to get familiar with programs like dctimestep and weather files if you aren’t already. Sarith Subramaniam’s tutorial is the usual go-to for these types of calculations.
Cheers,
-Greg
Hi Hannah,
There are ways to do this using an image projected into the sky. If your skills with grasshopper (or other programs) enable you to create a fisheye projection of the skies / skydomes that you want to test (with all necessary stripes), you could convert that image to an .hdr (using ra_tiff -r), which is then mapped into a skyfile using colorpict.
There are explanations elsewhere in the radiance discourse on how to map fisheye images into skies (for instance, to create image-mapped skies from hdrs), which can guide you through this. You don’t have to worry about calibrating the luminance of the sky you make since you’re not trying to get numerical luminance / illuminance data out of it.
You would then just render the image out with -ab 0.
This seems like the simplest option to me - and probably the easiest to check your work with.
Michael
