Hey Stephen, thanks for all of your suggestions! You’re right, the zero reflectance is likely to be wrong. I’ve increased it to .05 as a guess, as I don’t know how to measure them accurately yet. The -i .05 illum sphere is definitely correct, as the model is in meters, and I double checked by replacing “illum” with “light” and viewing it directly. I already have -ds .02 set, so that isn’t the reason either.
However, you’ve solved it! It turns out it’s the -dj parameter! After increasing it to -dj .8 it now looks exactly like it does in real life! I took your tips about pfilt, and you can see the results below.
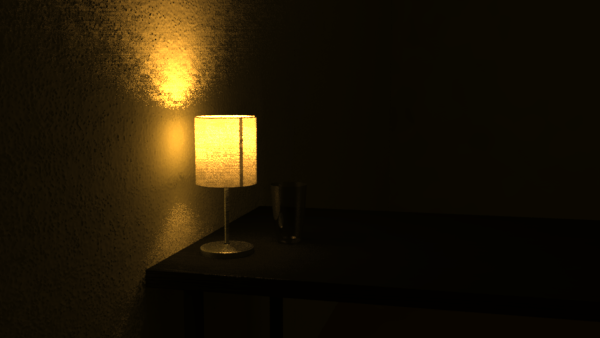
Edit: here is the exact same render, but with human exposure below.

I must say, looking back at it in real life and comparing, it looks really, really close. I think that’s it! I will now focus on adding more details and accuracy in materials. I should probably also mention I bought a luxmeter and took some measurements just above and under the lampshade in full spectrum light. I did this as the sun was setting so I managed to get many readings, and it shows a constant relationship. I used the average gradient as my trans value.
Edit: the book says that for glass, the transmittance value measured needs to be converted to transmission. I did not do any conversion, is this wrong?

Here is my revised lampshade material:
# The fabric weave has many small holes in it.
void brightfunc white_fabric_grain
4 dirt cal/dirt.cal -s .0002
0
1 .2

# Outer polyester RGB measured with Macbethcal
# Overall trans measured with luxmeter
# Inner polystyrene lining is .66 .66 .66, but I don't know how to set a single plane with two materials, one on each side
# Other values are made up
white_fabric_grain trans white_fabric
0
0
7 .66 .67 .59 .05 0 .288 .05
You will probably notice that I have added detail in the texturing. As long as the texture adds to the realism without breaking scientific accuracy, I would like to add as many real life textures as possible.
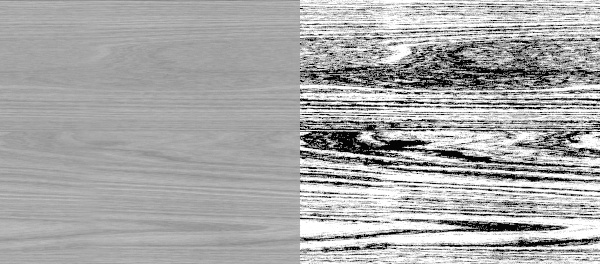
One of the vital textures to add is the table. The table is a acrylic painted fibreboard top. It is special because it has a cheap wood grain finish, and the wood grain alternates between non-specular and specular. Although I am not experienced enough to accurately measure the specular value yet, I started with a mixpict as follows:
# Average color .5 .5 .5
void colorpict diffuse_map
7 red green blue textures/table_diffuse.pic . frac(Lu)*(1024/901) frac(Lv)
0
0

# Macbethcal .03 .03 .02
diffuse_map plastic shiny
0
0
5 .06 .06 .04 .05 .1

# Macbethcal .03 .03 .02
diffuse_map plastic dull
0
0
5 .06 .06 .04 .01 .1

void mixpict black_acrylic_paint_on_fibreboard
7 shiny dull grey textures/table_specular.pic . frac(Lu)*(1024/901) frac(Lv)
0
0
For the curious, here is the diffuse and specular maps side by side.
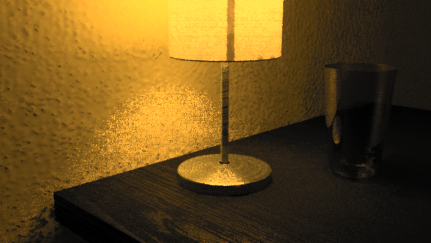
I also added some anisotropy, and a spiral brushed texture diffuse map to the lamp stand. I copied the new galvanised steel RGB values from the materials.rad file, but in the future when I learn how to measure it I will replace it with something more accurate.
The concrete wall is actually highly textured. It has a concrete stucco finish, with blobs of textured stuff created with a trowel. For the first pass, I sculpted / displaced the wall polygon instead of using any textures, so what you see is modeled. I got the scale wrong, it should be perhaps 10 times smaller, but the effect seems plausible. I need to investigate normal perturbation is more detail.
Here’s a close up render showing the effect of all these textures in play with the light.
I still have many questions, but I will start a new thread, as I am now satisfied with the lamp light simulation  Thanks very much everyone! I have learned a lot!
Edit: I have one more question about the lampshade transmittance I added inline above.