How to apply the Lorentzian function to simulated images?

Dear Radiance experts,

I found that using aBSDF significantly overestimated DGP values because I did not applied the blurring algorithm/filter mentioned in Greg’s Paper and Jan’s presentation.

I wonder how we could apply the Lorentzian function to hdr images by Gaussian function with FWHM=11. Any suggestion is appreciated, many thanks!

Best,
Sichen

Here is a c-shell script you can use to apply the blur. Save the code as a .csh file (e.g. blur.csh) and simply run on command line: blur.csh test.hdr > blurred.hdr

#!/bin/csh -fe
#
# Simulate Lorentzian function with FWHM=11
#
getinfo < $1 | sed 's/^EXPOSURE=.*$/EXPOSURE=1.0/' > myhead$$.txt
set vhoriz=`sed -n 's/^VIEW=.*-vh \([^ ]*\) .*$/\1/p' myhead$$.txt`
echo $vhoriz
set rhoriz=`getinfo -d < $1 | sed 's/^.*+X //'`
set pparcmin=`ev "$rhoriz/(60*$vhoriz)"`
set rad=`ev "5.7*$pparcmin" "22.6*$pparcmin" "42.4*$pparcmin"`
cat myhead$$.txt
rm -f myhead$$.txt
if ( "$rad[2]" !~ [1-9]* ) then
	echo "Input image is too small for this script"
	exit 1
endif
if ( "$rad[1]" !~ [1-9]* ) then
pcomb -s .85 -o $1 -s .11 -o "\!pgblur -r $rad[2] $1" \
		-s .04 -o "\!pgblur -r $rad[3] $1" \
	| getinfo -
else
pgblur -r $rad[1] $1 | pcomb -s .85 -o - -s .11 -o "\!pgblur -r $rad[2] $1" \
		-s .04 -o "\!pgblur -r $rad[3] $1" \
	| getinfo -
endif

Hi Taoning,

Thank you so much for sharing the code. It seems like this csh file can only be ran in a unix-like system, but I am not familiar with those systems. I am trying to understand the code and the algorithm in this paper, so I could come up with a code for Windows.

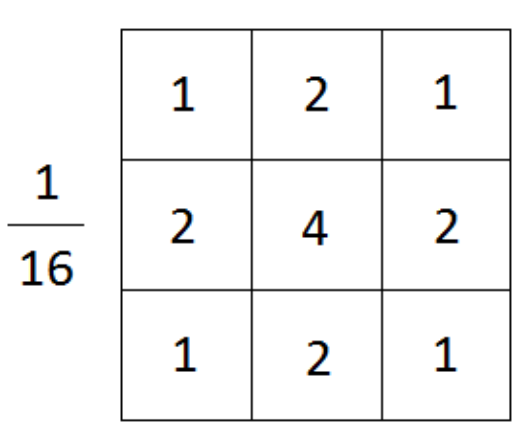
My question is how to define the size and standard deviation of a Gaussian kernel based on the given information such as spatial frequency (e.g.: 10 cycles per degree), radii, or “11% given to 2.6 cycles/degree”. For example, a 3x3 Gaussian kernel with a standard deviation of 1, will look like this (image source):
image

Many thanks,
Sichen

Here we’re assuming equi-angular projection, and once we figure out pixel/arcmin for our image we can apply the standard deviation from the paper as pixel radius (-r) to pfilt. Lorentian with FHWM=11 roughly mapped to standard deviation of 5.7 for gaussian. We(Greg) also added two additional blur at larger radius and weighted them at end to have a better fit to the lorentian (I guess?)

In Radiance, the actual blurring is done in pfilt. Here I have the equivalent Python script, maybe you can try the it on windows: python blur.py test.hdr out.hdr

import argparse
import math
import os
import subprocess as sp
import sys
import tempfile


def pgblur(radii, inp):
    reduc = math.floor(radii / 1.8)
    if reduc <= 1:
        return sp.run(["pfilt", "-1", "-r", str(radii), inp], check=True, stdout=sp.PIPE).stdout
    filt = radii / reduc
    dims = sp.run(['getinfo', '-d'], input=inp.encode()).stdout.split()
    pfilt1 = sp.run(['pfilt', '-1', '-x', f"/{reduc}", '-y', f"/{reduc}", inp], check=True, stdout=sp.PIPE)
    pfilt2 = sp.run(['pfilt', '-1', '-r', str(filt), '-x', dims[3], '-y', dims[1]], input=pfilt1.stdout, check=True, stdout=sp.PIPE)
    return pfilt2.stdout


def humanblur(inp):
    """Simulate Lorentzian function with FWHM=11"""
    header = sp.run(['getinfo', inp], check=True, stdout=sp.PIPE).stdout
    view_line = [l for l in header.decode().splitlines() if l.strip().startswith('VIEW=')][0]
    parser = argparse.ArgumentParser()
    parser.add_argument('-vh', type=float)
    args, _ = parser.parse_known_args(view_line.split())
    vhoriz = args.vh
    out = sp.run(['getinfo', '-d', inp], check=True, stdout=sp.PIPE).stdout.decode().split()
    rhoriz  = int(out[4])
    pparcmin = rhoriz / (60 * vhoriz)
    rad = 5.7 * pparcmin, 22.6 * pparcmin, 42.4 * pparcmin
    if rad[1] >= 10 or rad[1] < 1:
        raise ValueError("Input image is too small")
    if rad[0] >= 10 or rad[0] < 1:
        with tempfile.TemporaryDirectory() as td:
            blur1 = os.path.join(td, "blur1")
            blur2 = os.path.join(td, "blur2")
            with open(blur1, 'wb') as tmp:
                tmp.write(pgblur(rad[1], inp))
            with open(blur2, 'wb') as tmp2:
                tmp2.write(pgblur(rad[2], inp))
            proc = sp.run(['pcomb', '-s', '.85', '-o', inp, '-s', '.11', '-o', blur1, '-s', '.04', '-o', blur2],
                          check=True, stdout=sp.PIPE)
            return proc.stdout
    else:
        with tempfile.TemporaryDirectory() as td:
            blur1 = os.path.join(td, "blur1")
            blur2 = os.path.join(td, "blur2")
            with open(blur1, 'wb') as tmp:
                tmp.write(pgblur(rad[1], inp))
            with open(blur2, 'wb') as tmp2:
                tmp2.write(pgblur(rad[2], inp))
            blur0 = pgblur(rad[0], inp)
            proc = sp.run(['pcomb', '-s', '.85', '-o', '-', '-s', '.11', '-o', blur1, '-s', '.04', '-o', blur2],
                          check=True, input=blur0, stdout=sp.PIPE)
            return proc.stdout


if __name__ == "__main__":
    with open(sys.argv[2], 'wb') as out:
        out.write(humanblur(sys.argv[1]))
Hi Taoning,

Thank you for explaining algorithm and sharing the code. It works well and blurs the image.

I deleted this line of code, but it is not working on my system.

dims = sp.run([‘getinfo’, ‘-d’], input=inp.encode()).stdout.split()

Instead, I manually entered the image size (1000 by 1000) to the code.

pfilt2 = sp.run([‘pfilt’, ‘-1’, ‘-r’, str(filt), ‘-x’, ‘1000’, ‘-y’,‘1000’], input=pfilt1.stdout, check=True, stdout=sp.PIPE)

Best,
Sichen

It should probably be

dims = sp.run([‘getinfo’, ‘-d’], input=inp.encode(), stdout=sp.PIPE).stdout.split()

Anyway, glad it works out.

Hi Taoning,

I see, thank you so much!

Best,
Sichen