Work in progress - living room

Hello all! I just wanted to share the latest picture of the render I am working on. The goal is to combine the workflows that CG artists use with the scientific validity of Radiance to create renders that are both validated and also photoreal. This means using detailed textures and models.

Here’s where I’m up to so far, I’ve added textures to the keyboard, mouse, and monitor, and the wall stucco is sculpted. Everything measured with macbethcal. I noticed that modeling the computer monitor is tricky, but thanks to Greg I copied his VDT files which seemed to give good results (the only difference is that my monitor outputs 200cd/m2 instead of 250cd/m2).

Currently wondering how I can better model the LED light coming out from the laser mouse. Currently it is a light object with 10% of the computer Radiance as a ballpark value (checked with a luxmeter). Apart from that I have also made guesses for specularity and roughness values with guidance from the Rendering with Radiance book.

Note: image adjusted for DISPLAY_GAMMA=1.6.

Hope you like it :slight_smile: I will post more updates here as the image evolves.

Edit: All models, textures, and material definitions will be made available for free and open-source.

3 Likes

Update:

  • Rendered with rpict instead of rvu at a higher quality to fix noisy light.
  • “Microsoft” logo on mouse increased size.
  • Added cloth to make scene more natural
  • Added tangled earphones to make scene more natural
  • Keyboard keys have a slight curve now just like in real life, so that specular light has a gradient instead of being constant
  • Added a light switch and wall inset in the background wall just like in real life
  • Added wire and switch for table lamp

I have learned that extremely dense meshes will sometimes not show up (see in the previous image how the mouse’s wire was sparkly and half invisible) even if I set -ps to 1.

This looks really nice – how are you filtering the output? Do you render at a higher resolution and reduce the output with pfilt? This is the normally recommended method for controlling aliasing. If you attach the output of getinfo on the final Radiance HDR image, I might offer some suggestions for that.

Thanks Greg! I am using rad, with QUALITY=HIGH so I believe it uses pfilt to scale it down for controlling aliasing. Here’s the attached getinfo:

scene_v1.hdr:
        #?RADIANCE
        rpiece -F scene_v1_rpsync.txt -PP pfuIzZYk -t 15 -vh 49.13434264120263 -vv 28.84154625502197 -vp 0.5879582166671753 -1.133952021598816 0.34054961800575256 -vd -0.23700669407844543 0.9646517634391785 -0.11521711945533752 -vu -0.027499962598085403 0.1118871420621872 0.9933403730392456 -x 2880 -y 1620 -dp 4096 -ar 127 -ms 0.041 -ds .2 -dt .05 -dc .75 -dr 3 -ss 16 -st .01 -ab 3 -af scene.amb -aa .1 -ad 1536 -as 768 -av 10 10 10 -lr 12 -lw 1e-5 -av 0 0 0 -ds .01 -dj .8 -dt 0 -ps 3 -pt .04 -o scene_v1.unf scene.oct
        SOFTWARE= RADIANCE 4.2a lastmod Mon May 11 13:27:51 PDT 2015 by rgugliel on ubuntu
        VIEW= -vtv -vp 0.587958 -1.13395 0.34055 -vd -0.237007 0.964652 -0.115217 -vu -0.0275 0.111887 0.99334 -vh 49.1343 -vv 28.8415 -vo 0 -va 0 -vs 0 -vl 0
        CAPDATE= 2018:09:19 01:01:52
        GMT= 2018:09:18 15:01:52
        FORMAT=32-bit_rle_rgbe
        pfilt -m .25 -x 960 -y 540 -p 1.000
        EXPOSURE=2.117443e+00

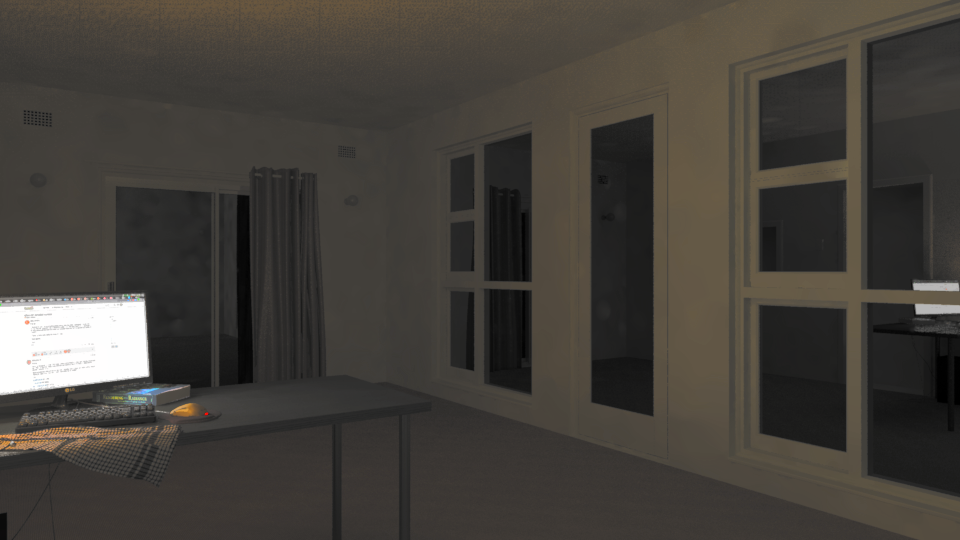
I wanted to share some analysis images today, the first is a photographic comparison of the scene. The first image is the render itself, the second image is a photograph of the render, and the third is the real-world photograph. I have converted all images to greyscale to prevent the issue of white balance.

Noticeable differences are the scotopic vision, camera overexposure of the lamp, the illumination of the monitor on the Radiance book, and the specular highlight of the keyboard. Comparing to my own eyesight, the scotopic vision and lamp exposure provided by Radiance is much more accurate than the photo. The keyboard specular highlight is probably due to my bad guess at a specular value, and book illumination is probably due to an inaccurate light distribution from the monitor.

For completeness, here is the same non-desaturated version.

An interesting psychological phenomenon I observe is that even though the Radiance image adjusted for the human eye is more accurate compared to what I visually see, personally I think the image looks more fake. My brain tells me it is a render and not a real scene. Whereas if I take a photo of it it (such as in the middle photo above) it looks more photorealistic despite being less accurate as to human vision. I guess I am trained to expect things like overexposed lamps and underexposed dark rooms, and my brain can compensate.

Update:

  • New camera angle!
  • Modelled walls, sliding door, wall sconces, curtain, ventilation grille, windows, and side door
  • Measured door frame, door handle, curtain, and sconce globe material

I wonder if your ability to spot the rendering is also influenced by just the slightest aliasing or other artifacts even if you don’t consciously notice them - you’re probably trained over many years of looking at renderings and photos.

It would be interesting to also study some situations where I sometimes see a professional architectural photograph and have to stare at it a while and still think it looks like a rendering even when i know it’s a photograph. I wonder what characteristics are tricking me that way - almost certainly in the photographers post-processing rather than the raw image from the camera. Maybe the color toning, or softening of the image?

I think you’re absolutely right, Christopher, that we are subconsciously able to notice minute artifacts that allow us to spot when a picture is just a render and is fake. One of the end goals is to present renderings that people believe are real, so part of that is to somehow make the render look like a photo.

In this case, I have decided to apply a few post-processing on the final render. First, I do pcond -h to give a “human subjective” view, as despite the post processing to make it more like a photo, I want the image to still be based on a human interpretation.

Next, I pass it through a series of filters:

  1. I rotate the image by 2 degrees. It is my experience that average Joe with his camera does not use a tripod and therefore no image will be perfectly horizontal unless you are a professional photo taker :slight_smile:
  2. I add lens distortion. During this process, chromatic aberration is also introduced. Also a coloured noise is introduced which always seem to occur in low quality photos, especially those in low light with high ISOs.
  3. The image is scaled up to counter shrinkage of the “picture frame” due to distortion and rotation
  4. A faux, basic, depth of field is introduced. A z-depth pass is quickly rendered out to serve as an input, from Blender, but it could come from any program.
  5. A very slight sharpening is introduced (due to step 6)

You can see the compositing node setup in Blender here:

Then, to counter the issue of aliasing, as some photos have a low quality that we associate with genuine photos, I save it as a compressed JPEG - so the JPEG compression masks out the crisp perfectness of the original image. This is why I made it sharper earlier, so that the compression doesn’t make things too blurry.

This is the outcome:

I also feel that presenting the image as a mere image makes people focus a lot on the image! Perhaps it is best to distract them and talk about other things, with the image merely part of the story. Also perhaps if you place the image in a badly formatted slideshow template (no self-respecting CG artist would ever do that!) then that would persuade people that they are indeed looking at a photo. Here’s my fun experiment :slight_smile:

Maybe I’m just being silly, but it would be good to know what others think :slight_smile: Of course, all images need a good foundation, such as good modeling, good texturing, and good Radiance light & material definitions, and accurate Radiance rendering settings. So a part that makes the empty room still look fake is that it is lacking things like light switches, GPOs, more furniture, bumps in the carpet … so on and so on.

Update time!

  • Modelled door knob, door lock, 3 door curtains (left one is rolled up all the way, though), window latches and locks, door air seal, sliding door handle, curtain adjustment string
  • Modelled some furniture: shoe rack and lamp including switch, wire, and GPO
  • Fixed colour of white painted concrete walls - I noticed I had originally measured the wall along a point where it was adjacent to a lime green wall, and the lime green colour was bleeding onto my measurement area. I’ll try not to make that mistake again!
  • Added vision strip decal texture onto sliding door glass

Here is the scene again during the daytime, 2pm, around this time of year. The spring afternoon sun is coming through the windows. I am applying the skyfunc from !gensky 9 30 14 -a -33.x -o -151.x -m -150 +s (lat/lon obfuscated for privacy) to a glow RGB of 1 1 1, hence the desaturated sky. In reality, this room is mostly overshadowed by surrounding context and vegetation, so I don’t actually see all this direct sunlight penetrating the room.

The render is filtered with pcond -h (and screenshotted under DISPLAY_GAMMA=1.6), but I am very curious as to why the computer monitor now looks extremely dark. I can guarantee it isn’t the case in real life. Also the room looks extremely high contrast compared to real life. Perhaps this contrast is due to all of the direct sunlight (in real life only a bit of direct sun enters, the rest is blocked by context and is therefore diffuse light - in real life I don’t see much, if any sky at all!) It looks as though all the artificial lights have lost all potency. I guess I’ll find out when I model more context.

Here’s a wireframe for those who enjoy that sort of thing :slight_smile:

1 Like

The amount of “sky” visible through the window might be distorting the pcond interpretation compared to the way you see it. Adding in the trees or a few fake buildings out on the horizon might reduce the average brightness notably - although I don’t know for sure if the -h human perception function is affected by the number of bright pixels, or just the maximum and minimum pixels.

Also I find that adjusting the -d dynamic range in the pcond command quite useful if you’re trying to use pcond to show the full range while also influence the picture closer to your perception or intention for the image.

PS, thanks for continuing to share… very thorough modeling, and process, with nice results!

1 Like

Why are you using DISPLAY_GAMMA=1.6? I think this only ever applied to MacOS 9 and earlier. Either don’t set this variable (leaving a 2.2 default0, or set it to something you’ve determined empirically.

Thank you Christopher and Greg! I think you are right, that it depends on the interpretation due to visible sky. As I model more context we will see how it changes. Greg, I am using DISPLAY_GAMMA=1.6 as determined per the instructions in section 5.1.5 of Rendering with Radiance. I have determined my specific computer monitor to be 1.6, so I have selfishly used that value before screenshotting the results and posting here. Is this the wrong approach?

Meanwhile, I am working on the context. This room is situated like a basement, surrounded by planter beds and a backyard. The environment is heavily textured and vegetated. I can either artistically remodel all the vegetation (which would be slightly dull), but I would like to experiment with the ability to reconstruct context models - simply because although I can generate vegetation and so on, it is quite some work to make things look genuine. This also tests the workflow of combining a 3D scanned environment with virtual alterations, which is something architects do.

As the area is quite large, and I have no budget for LIDAR, and I care about texture reproduction, I have chosen to split up the back yard into zones, photogrammetrically reconstruct each zone, then merge them. Here’s a test bush point cloud I scanned. I used my phone’s camera, nothing fancy.

2018-10-01-182719_679x495_scrot

Here’s a portion of planter bed.

And here’s the fully textured mesh reconstruction.

All scans are done under diffuse light conditions. This allows me to later measure some macbethcal and calibrate the textures. The above render (in Blender’s Cycles, for quick testing, not Radiance) shows how it might look with a noon-ish sun. Getting perfect materials is not vital for vegetation, as it serves mainly for photorealistic effect, and there is a lot of variation anyway.

The reconstruction of thin surfaces, especially those that blow in the wind, like fern fronds are generally very difficult. As such the reconstruction is not perfect as leads to “bulbous” leaf shapes, and the look as though some leaves are covered in spider webs. Yikes.

I’ve inserted the two portions I’ve scanned so far and rendered it in Radiance (brighter image due to no DISPLAY_GAMMA being set). The planter bed is in the right location, but I just dumped the small bush in front of the door for fun.

And here’s the “photo-quality” version :slight_smile:

1 Like

I too am enjoying this thread, and appreciate your rigor on all of this. Quick aside question, what are you using to generate these point clouds of the exterior objects? You said you’re using your phone’s camera for input, but what did you to with those images to get the point cloud/geometry for Radiance?

Hi Rob! Thanks for the feedback. I am taking a video of the object with my phone by walking around the object. Then I use ffmpeg to convert the video to frames with ffmpeg -i *.mp4 -r 2 -f image2 -start_number 0 image-%07d.jpg. I then use colmap which is an open-source photogrammetry software. It is very easy to use.

colmap will check for correlating features between camera frames, and use a bit of math to figure out camera positions and therefore a depth-map of points in each frame. This creates a “sparse reconstruction”. It then interpolates between points to densify the point cloud. This creates a point cloud with XYZRGB data.

Here’s an example of features it has found (red dots). Naturally, heavily textured, diffuse surfaces that don’t move (e.g. not leaves blowing in the wind) work better.

2018-10-07-230923_623x419_scrot

And here’s an example of the point cloud, showing the camera positions. This comes from about 5 minutes of footage.

colmap has a feature to then convert the point cloud into a mesh, but I find it is better to use meshlab, another open-source mesh manipulation program, to convert the point cloud into a mesh. I use the Poisson reconstruction algorithm.

Here’s an example of the mesh reconstruction of the small bush. You can see that darker areas inside the bush cannot be detected by the feature extraction, and therefore there are no points there. So, the mesh reconstruction tries to interpolate between points, creating a weird looking shape. All in all, photogrammetry is bad for this type of geometry scanning, but has excellent texture support.

2018-10-07-231229_609x484_scrot

Here’s an example of the planter bed. There are many very thin ferns. As the mesh reconstruction likes to interpolate, it does not realise that the points along the fern frond represent a very thing surface, and therefore interpolate incorrectly, especially to the underside of the frond which is darker and has less camera frames. This is a very bad reconstruction, but passable viewed from a distance with texture.

When a mesh is created, the RGB data is mapped onto vertices on the mesh, therefore the mesh has vertex colours and looks like the object. A final step, called “Texture parameterization-texturing from registered rasters”, basically takes the frames from the camera positions, and projects these frames onto the texture UV map of the 3D object. I can then export it to an .obj file and use it in Radiance. Here’s an example of a generated texture map - you can see it’s quite hectic!

Finally, you can then clean up the reconstruction with mesh sculpting tools. For this, I use Blender.

I hope the explanation made sense. You may also want to check out vsfm, which is a bit older than colmap, and created by one of the folks who invented very important algorithms in the field of photogrammetry.

1 Like

Thanks for this! This is a lot of great info on a topic I know little about. Very interesting stuff. I saw a cool presentation at SIGGRAPH in 2009 about this stuff, and I never followed up on it. Clearly, progress has been made. =)

1 Like

Update time! It’s been a rainy week down here in Sydney, Australia, so my attempts to continue to scan the backyard and photograph colours have not succeeded too well. In the meantime, I have focused on providing some image based lighting (IBL).

IBL through the use of HDRI environment / sky maps are extremely common in CG art. I would like to use the very same here, with the prerequisite that it should not adversely affect the scientific accuracy of the simulation. I had the idea to merge and calibrate an outdoor environment map with a CIE sky so that I could benefit from the accuracy of a CIE sky whilst maintaining the colourful variety that an environment map provides. I first posted an idea here last year, but never followed up with my various tests.

Anyway, to start with, I created a mask for the skymap so that the sky itself would be hidden.

Then I combine the skymap with the CIE sky using the mask in a mixpict. However, first, I roughly calibrate the skymap’s luminance by making the ground in a sensible range of values. I can calibrate further by taking some macbethcal measurements of the grass and creating my own panoramic skymap photos, however, I don’t yet know how to do this. For now, this ballpark figure calibration will do.

I also get the impression that the skyfunc can be applied to any arbitrarily blue colour. To get some sensible sky blue, I measure the median blue in the original sky photo and try to achieve that ratio of R, G, and B.

Here is my full definition with some comments.

!gensky 9 30 14 -a -33 -o -151 -m -150 +s

void colorpict env_map
7 red green blue textures/noon_grass_16k.hdr cal/skymap.cal map_u map_v
0
1 0.5

# This is a multiplier to colour balance the env map
# In this case, it provides a rough ground luminance from 3k-5k
env_map colorfunc env_colour
4 100 100 100 .
0
0

# .37 .57 1.5 is measured from a HDRI image of how "blue" the sky is
# It is multiplied by a factor such that grey(r,g,b) = 1
skyfunc colorfunc sky_colour
4 .64 .99 2.6 .
0
0

void mixpict composite
7 env_colour sky_colour grey textures/noon_grass_2k_mask.hdr cal/skymap.cal map_u map_v
0
2 0.5 1

composite glow env_map_glow
0
0
4 1 1 1 0

env_map_glow source sky
0
0
4 0 0 1 180

env_colour glow ground_glow
0
0
4 1 1 1 0

ground_glow source ground
0
0
4 0 0 -1 180

This gives a result as follows. On the left is a pure CIE sky and ground glow. In the middle is my roughly calibrated skymap & CIE composite viewed in greyscale. On the right is the colour version.

And finally, here’s the updated render with the skymap! It gives a pretty good result, and like my other tests which I did not post, does not seem to adversely affect the accuracy of the simulation.

1 Like

I have decided that the photogrammetrically scanned planter beds and vegetation are not good enough. In a blurry photo at a distance, it holds the illusion, but at any larger scale it is clear that it is a virtual, low-quality reconstruction. Here’s an example of a blow-up:

I’ve decided to go down the traditional route of creating 3D plants and using particle systems to arrange them. I’ve identified 5 species which grow in the planter bed:

  1. Nephrolepis exaltata - (or maybe cordifolia, hard to tell)
  2. Chlorophytum comosum
  3. Crassula multicava
  4. Tradescantia pallida
  5. Vinca major variegata

I have modelled each of these species as alpha-mapped planes. To prototype the leaf models, I used Blender’s Cycles render to quickly place it in a scene or distribute them around to make sure they looked decent. Here’s the Nephrolepis exaltata. Part of what makes it a bit more believable is to also model dead stripped stems (as they grow older, the frond strips back to bare stems).

Some Chlorophytum comosum…

Some Crassula multicava …

Here’s a ball of the Tradescantia pallida.

2018-10-17-213638_482x414_scrot

For those interested, here is the single “stem” (the stem is also an alpha-mapped plane) that it is generated from. You can see I have paid attention to the leaf arrangements / growth pattern. This plant is also interesting in that the front face and back face of the leaf have different colours. I have achieved this as follows:

void mixfunc tradescantia-pallida-leaf1-diffuse
4 tradescantia-pallida-leaf1-diffuse-frontface tradescantia-pallida-leaf1-diffuse-backface if(Rdot,1,0) .
0
0

2018-10-17-215912_521x329_scrot

Finally some Vinca major variegata.

Here they are all combined and randomly distributed in the planter bed. The planter bed really is a mess of all these species. I’m not entirely happy with the arrangement of the ferns and think I may have underestimated the amount and arrangement, but oh well.

I took various leaf samples and used macbethcal to work out their colours. So all colours in all leaves as well as the planter bed wall should be roughly right (leaves naturally have quite a lot of variance in their colours, so it isn’t too important to be super precise).

There is the slight issue of the particle distribution causing leaves to penetrate through the planter bed wall, but I may just fix this in post production, and it is unlikely to be noticed in other angles. Here’s the view again from the indoors.

I should mention some housekeeping. I have decided that having a top-level directory structure of textures, obj, and so on does not scale well with many models, and also does not allow me to easily bundle and reuse objects. I have decided to create isolated, atomic, “libraries” in the lib folder. Each “library part” will have its own folder, with its own obj, tex, and mat files (maybe ies too if it is a luminaire). Anybody can copy and paste these self-contained directories and use them in their own project. You can see the example structure in the git repository.

Everything is available as CC-BY-SA, so feel free to start using these plants in your own models! :slight_smile:

2 Likes

After a month break from this project, I’ve decided to resume :slight_smile:

  • Fixed the door height, I realised that I did not pay attention to the height when I modeled it, so now it is a normal sized door!
  • Added metal grille to door and thin black mesh to door (alpha mapped texture) - the black mesh is very slight, but serves to dim the light coming through ever so slightly
  • Added fencing around the backyard
  • Added part of the house that juts out of view of the shot, but the impact is that the sunlight does not come in through the window in the bottom right of the image - this is how things are in real life
  • Added some decorational small trees (alpha mapped planes) that live in the planter box - radiance RGB colours for these trees are “in the ballpark” but aren’t vital to be super accurate, as vegetation varies greatly anyway and it is purely in the background.
  • The trees now block the sunlight casting beautiful leafy shadows on the carpet.
  • Added a backyard-textured plane (gee, it seems overexposed in this shot - maybe the human exposure compensation can’t quite handle it) with some bushes in the background.

I think it’s almost there. I’ll probably add bits and bobs of entourage and render out at a higher resolution. I would be keen to know what the community think, and how real you feel this image is.

Edit: the backyard is indeed quite over-exposed. I’m not entirely sure why this is - I have tried doing a plain plastic material with the RGB values of the grass I have measured with macbethcal, and it is indeed turning out quite bright. I am currently guessing that it is a limitation of pcond -h that is unable to adjust for the human eye.

1 Like

This actually looks pretty good to my eye. There is a more advanced tone-mapper built into the JPEG-HDR type written into Photosphere (available from anyhere.com for Mac). If you write your image out using Photosphere, it will probably look slightly better.

Nice work!

Hi Greg! Unfortunately, I don’t have a Mac, so I can’t download it. I did download the hdrgen for Linux, but I’m not sure if that’s what you’re referring to, as it looks as though it actually creates HDRs. I’m not sure how to use it exactly in my scenario and can’t work it out from the man page.

Meanwhile, here’s an update, and happy new year! Updates includ:

  • New saw-horses in the room. Yes, I, uh, do have saw-horses in the room.
  • Shoes on the shoe rack. There are my black work shoes.
  • Fixed the trees on the right. Previously I made a mistake which meant that the textures were distorted because I didn’t multiply frac(Lu) by the aspect ratio of the texture. Now it is fixed and looks much nicer. They are alpha mapped plane trees.
  • I replaced the alpha mapped plane bushes in the background with the photogrammetrically scanned and reconstructed bush that I had shown earlier in the thread, calibrated with macbethcal. This gives a much better sense of depth and shadow compared to a alpha mapped plane approach, which is expected.
  • I modelled the grass in the backyard! There are also dead leaves, flowers, and weeds, but unfortunately at this perspective you can hardly see them. However, all that subtlety adds up to create what I think is now a pretty convincing backyard.
  • Added some bricks in the back yard. There is actually a pile of bricks on a concrete plinth in the back, but it is so overexposed you can’t even see it. This is obviously incorrect for the human eye, the human eye can certainly see it. A photo, on the other hand, can not.

For those who haven’t seen the other thread where I test rendering out grass in detail, you can read it here.

Here is a rough comparison of the real space in greyscale. Apologies for the absolute mess in the room. It’s something of a workshop. Also, I didn’t match up the images perfectly in terms of viewpoint, the screendoor is open, there are obviously more objects, and the time of day is also not quite the same, even though it is roughly in the afternoon.

… and a colour comparison. I did tweak the white balance of the photo to match the render in this case, but nothing else, only white balance. I think that is allowed, eh? :slight_smile:

I’m pretty happy with it so far :slight_smile: and I think the simulation is pretty close. Of course it will never be 100% perhaps, what with not having a spectrometer, modeling errors, human eye correction, etc.

I am considering whether to model more objects and fill up the room with junk, or to call it a day and move on to doing things like creating BIM models, classifying objects and releasing them for free online, and other tangential experiments.

Another update! I’ve started experimenting with turning this into a VR scene. I’ve been asking questions about VR panoramas in Radiance, and here is my first attempt. You can view it with WebVR on your browser here. If you view it on your phone you can get the split view, and if you have a Cardboard VR, you can put on the goggles and check it out!

The WebVR is built on A-Frame, which is a wrapper to ThreeJS, which is all open-source, self-hosted, and only a few lines of code to implement online.

Here’s a screenshot for those who like a visual preview before clicking that link :slight_smile:

And yes, my living room does indeed having an entire back wall with a green colour!

There are still many issues with it. The current technique used is a cubemap, filtered with pcond using a combined histogram. The list of issues include:

  • Low resolution. The resolution is currently 1024x1024, but this is the raw dimension, not the pfilt dimension so it needs to be much larger! I may need to render the raw at 3072 then scale down.
  • Cubemap edges slightly visible
  • Strange light leaks
  • Scene incomplete, you can see the end of the fence and no ground where the planter bed is. I never bothered modeling that part before because it wasn’t visible in the perspective.

2019-01-05-105206_983x829_scrot

In addition, there are these issues:

  • Blotchy rendering, perhaps just a condition of using a low-resolution render
  • My arrayed wall does not tile perfectly and so the edges appear black
  • The seam of where the tiled stucco wall ends and the simplified flat wall starts is very obvious

2019-01-05-105150_855x652_scrot

You can try increasing the -ar setting, decreasing -aa, and increasing -ad and -as to battle the interreflection patchiness. Be sure to remove the old ambient file, which I assume you are using. Also, you can seed the ambient file with an “overture” low-resolution rendering that you throw away before the real one, sending it to /dev/null like rad does. If the light-leaks persist, you may need to add thickness to your walls and ceiling if they are not already modeled that way.